> ## Documentation Index
> Fetch the complete documentation index at: https://help.peerlist.io/llms.txt
> Use this file to discover all available pages before exploring further.
# Custom Domain
> Peerlist now offers custom domain integration, allowing you to host your Peerlist profile on your personal domain and use it as your portfolio.
export const PEERLIST_EXTERNAL_LINKS = {
addProject: 'https://peerlist.io/user/projects/add-project',
addExperience: 'https://peerlist.io/user/resume/add-experience',
addEducation: 'https://peerlist.io/user/resume/add-education',
addCertification: 'https://peerlist.io/user/resume/add-certification',
addVolunteerWork: 'https://peerlist.io/user/resume/add-volunteer-work',
addCohort: 'https://peerlist.io/user/resume/add-cohort',
signup: 'https://peerlist.io/signup',
customDomain: 'https://peerlist.io/user/settings/custom-domain',
verification: 'https://peerlist.io/user/settings/verification',
projects: 'https://peerlist.io/projects',
launchpad: 'https://peerlist.io/launchpad',
account: "https://peerlist.io/user/settings/account"
};
 ## **Step-by-step guide to integrate custom domain.**
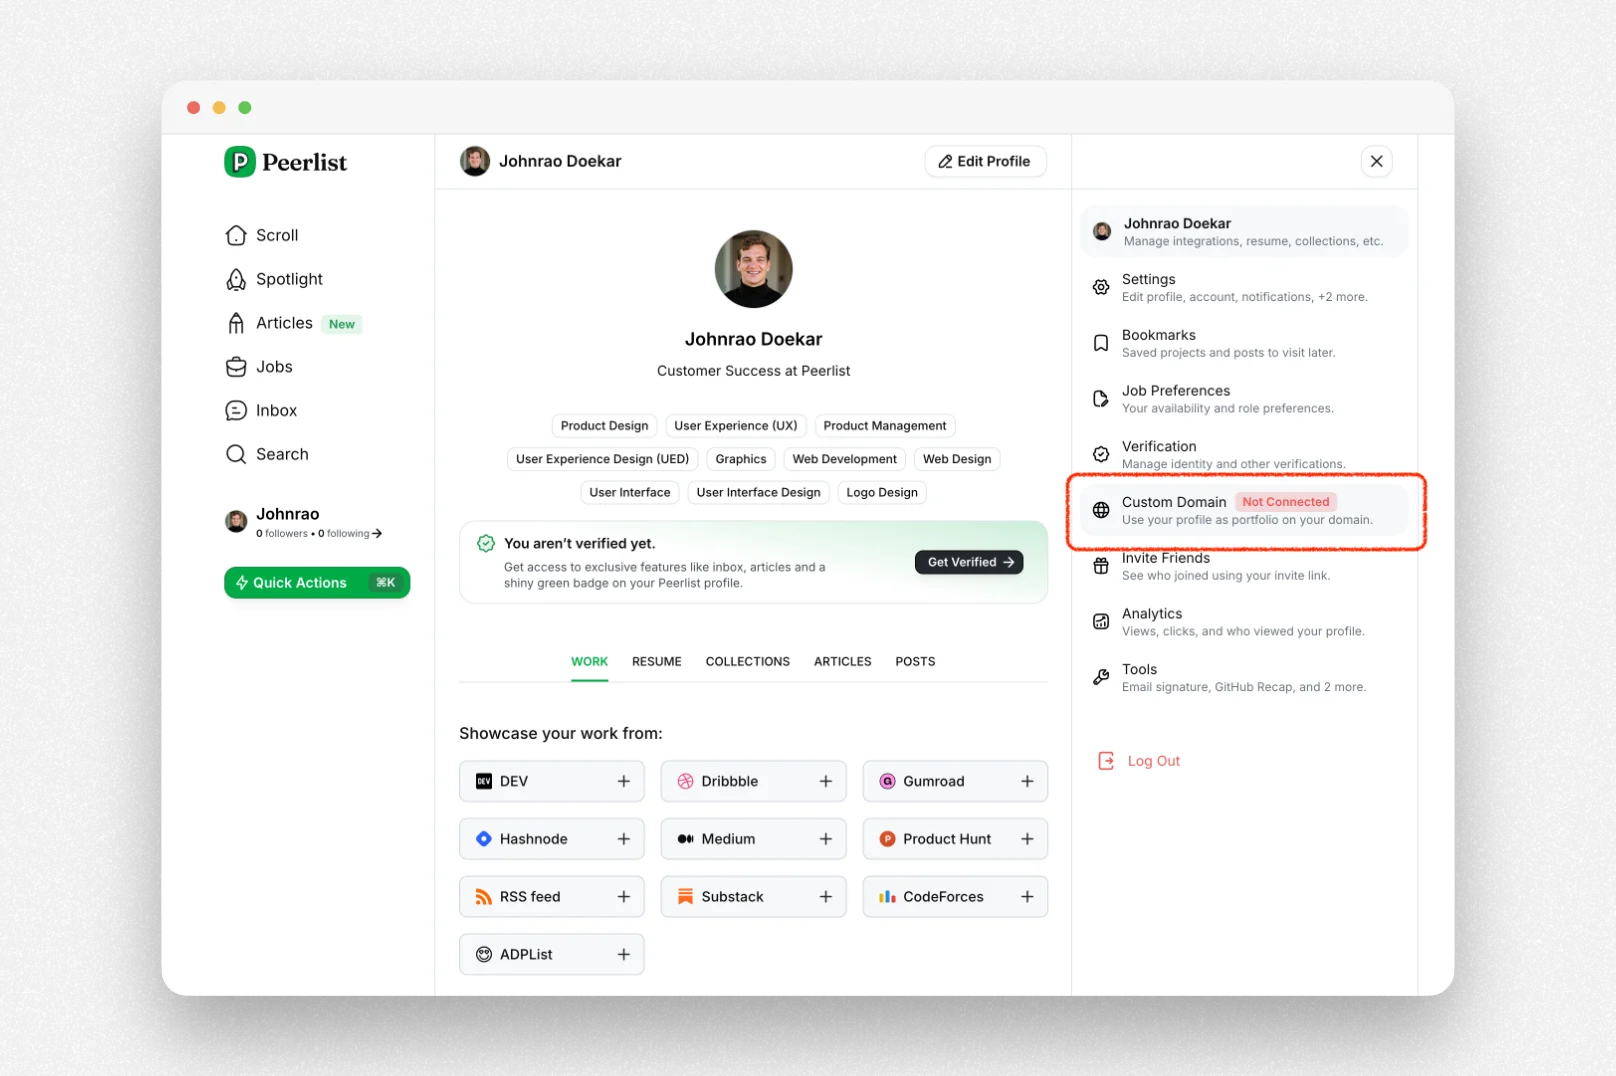
Open the right side panel menu by clicking on your profile picture in top-right corner.
Click on Custom Domain option. You can directly open the settings by going to this link — {PEERLIST_EXTERNAL_LINKS.customDomain}
## **Step-by-step guide to integrate custom domain.**
Open the right side panel menu by clicking on your profile picture in top-right corner.
Click on Custom Domain option. You can directly open the settings by going to this link — {PEERLIST_EXTERNAL_LINKS.customDomain}
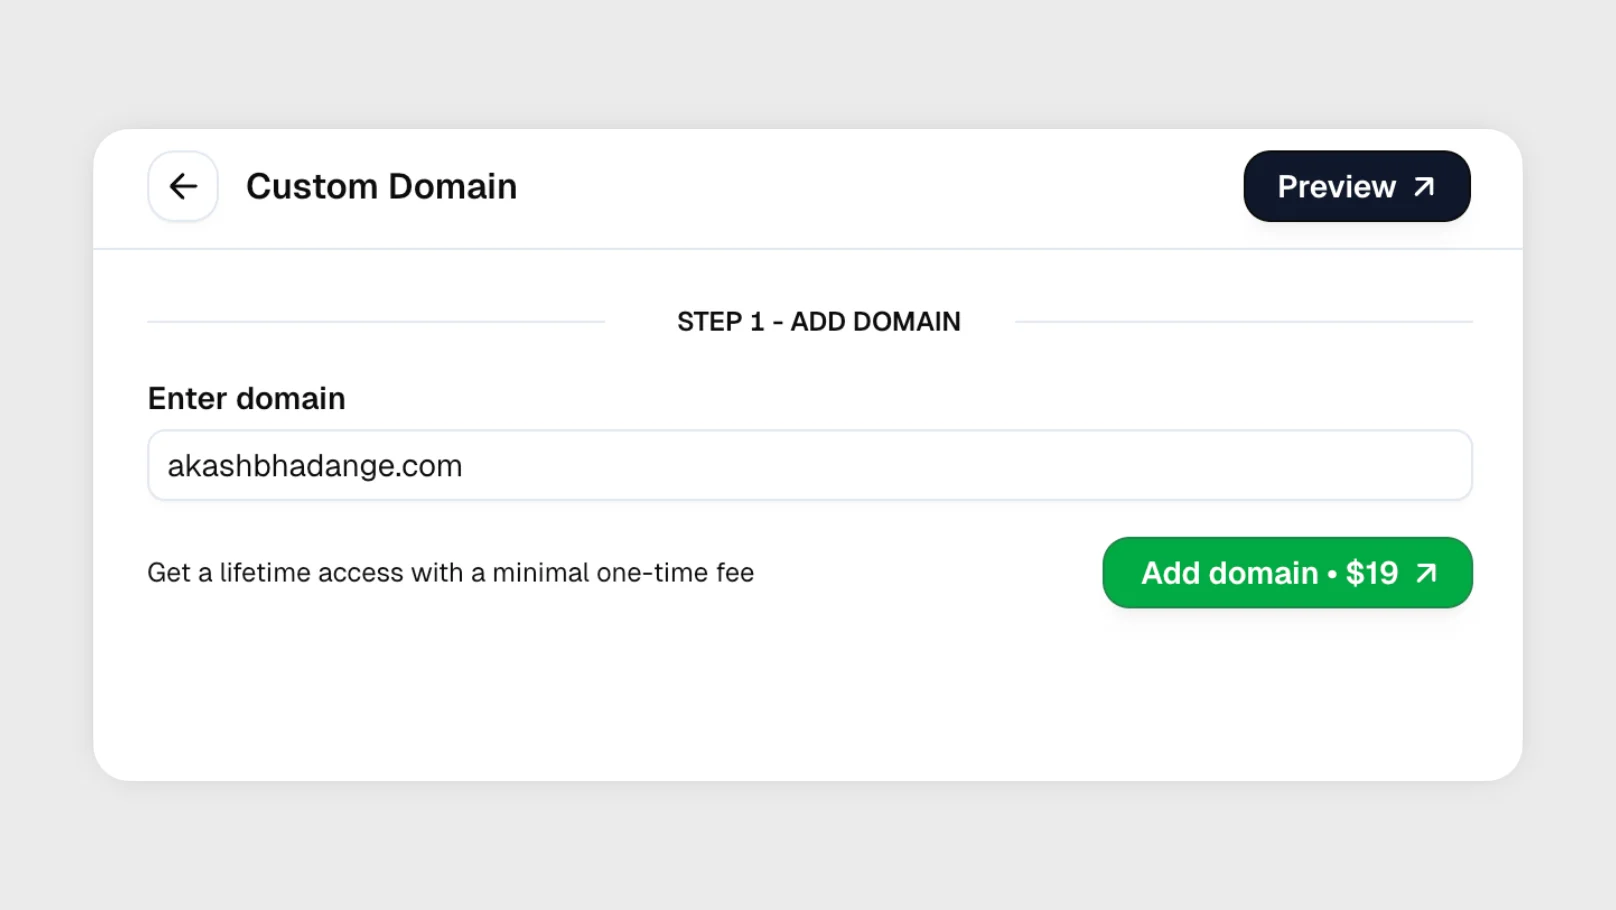
 Enter your domain name and click on **Add domain** — You will be redirected to Stripe for payment
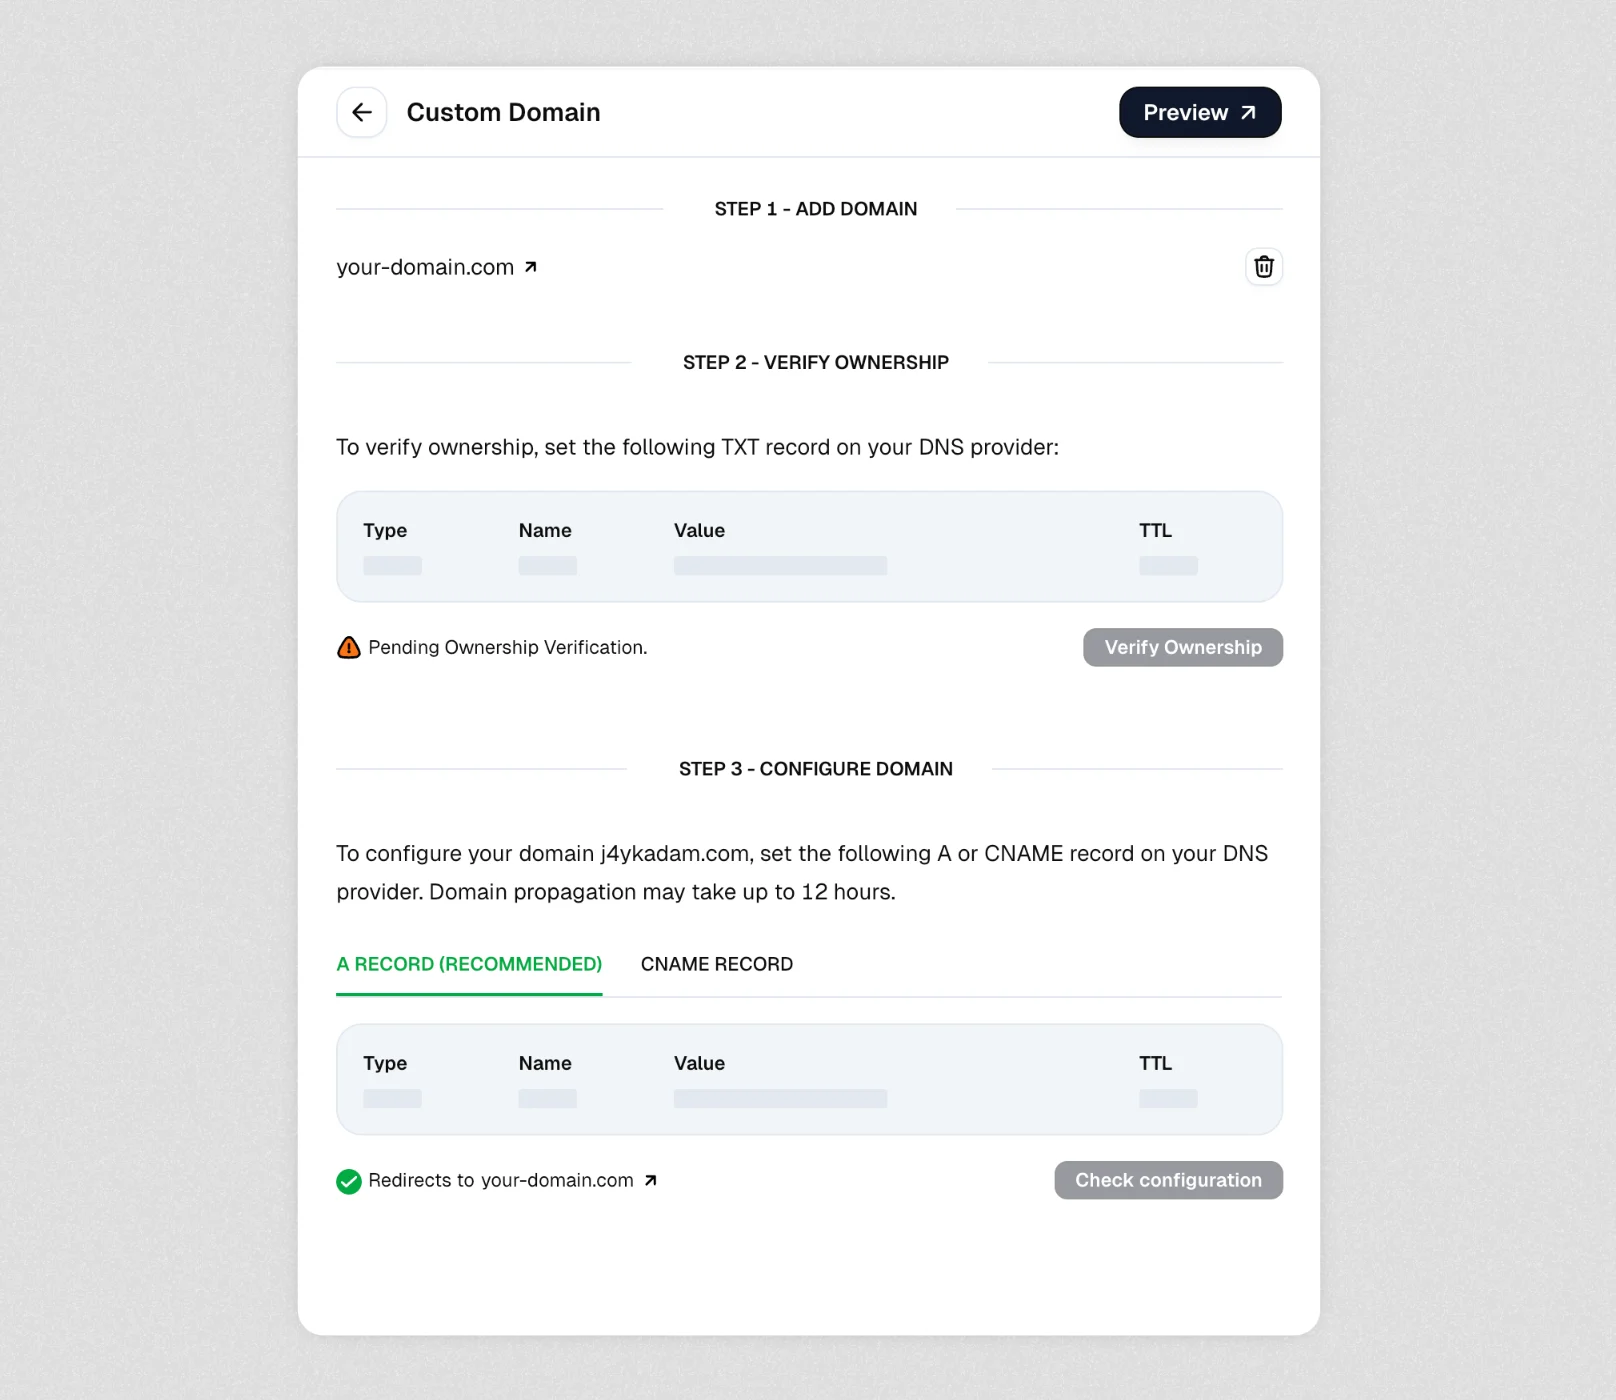
 To verify domain ownership, please add the TXT record to your domain. Once added, click on **Verify Ownership**.
Note: It may take anywhere between 30-60 minutes for domain propagation.
To verify domain ownership, please add the TXT record to your domain. Once added, click on **Verify Ownership**.
Note: It may take anywhere between 30-60 minutes for domain propagation.
 Add A or CNAME record to your DNS settings. Once added, click on **Check Configuration**.
***
## **Troubleshooting**
Add A or CNAME record to your DNS settings. Once added, click on **Check Configuration**.
***
## **Troubleshooting**
 If your custom domain configuration page appears incomplete with missing information in the DNS record tables (as shown in the screenshot), your domain may have been connected using a legacy method that's no longer fully supported.
### How to resolve this issue
1. Disconnect your current domain: Click the trash icon (🗑️) located next to your domain name "[http://your-domain.com](http://your-domain.com)" at the top of the page.
2. Reconnect your domain: Start the domain connection process again.\
This will generate the proper TXT, A, and CNAME records needed for verification and configuration.
3. Follow the three-step process:
Step 1: Add your domain\
Step 2: Verify ownership by adding the provided TXT record to your DNS provider\
Step 3: Configure your domain by adding either the recommended A record or alternative CNAME record.
If your custom domain configuration page appears incomplete with missing information in the DNS record tables (as shown in the screenshot), your domain may have been connected using a legacy method that's no longer fully supported.
### How to resolve this issue
1. Disconnect your current domain: Click the trash icon (🗑️) located next to your domain name "[http://your-domain.com](http://your-domain.com)" at the top of the page.
2. Reconnect your domain: Start the domain connection process again.\
This will generate the proper TXT, A, and CNAME records needed for verification and configuration.
3. Follow the three-step process:
Step 1: Add your domain\
Step 2: Verify ownership by adding the provided TXT record to your DNS provider\
Step 3: Configure your domain by adding either the recommended A record or alternative CNAME record.